Third Dimension GapGun Pro Handbuch

© Third Dimension Confidential Document D13-1604-OP-EN-3.3
V7.5

2© Third Dimension Confidential Document D13-1604-OP-EN-3.3
V7.5
Copyright © 2016 Third Dimension
All rights reserved.
You must not reproduce or distribute any part of this
publication in any form or by any means, electronic or
mechanical, without prior permission in writing from
Third Dimension. This includes photocopying, recording
or any other information storage or retrieval system.
This version produced on 16 September 2016
For support with your GapGun Pro please contact Third
Dimension:
Brabazon Office Park, Bristol, BS34 7PZ, UK
T: +44 (0)3333 44 3000
F: +44 (0)3333 44 0041
www.third.com
The laser complies with IEC60825-1 AM2:2001.
Because your blink reflex provides enough protection, it
is called eye safe
•Do not shine in eyes
•Do not view with optical instruments
•Do not shine in open space
•Take care around reflective surfaces
LASER RADIATION
DO NOT STARE INTO BEAM
OR VIEW DIRECTLY WITH
OPTICAL INSTRUMENTS
CLASS 2M LASER PRODUCT

© Third Dimension Confidential Document D13-1604-OP-EN-3.3
V7.5 3
Page
Operator Guide 3
The GapGun Pro 4
Measuring with the GapGun 8
Checking Sensor Calibration 14
Administrator Guide 15
Creating a Checkplan 17
Measuring a Works Order 20
Setting nominals and tolerances 21
Glossary 23

4© Third Dimension Confidential Document D13-1604-OP-EN-3.3
V7.5
A. Laser source
B. Camera
C. Green indicator LEDs
D. Vchange collar release
E. Trigger
F. On / Off switch
G. USB slot
H. Touch screen display
I. Head power indicator
J. Red laser activity indicator
K. Drop Protection jacket
L. V-Standoff
M. Wrist strap
H
I J
K
L
M
A
B
C E
F
D
G
M
A. Desktop battery charger
B. GapGun Pro with VChange sensor
C. Calibration gauge block
D. Hex tool training artifact
E. Docking station
F. Docking Station Cabling
G. Calibration pin gauge
H. Gauge block cleaning brush
I. Clip-on rechargeable battery pack
J. Spare rechargeable battery
K. GapGun software memory stick
L. Space for Shock protection sensor jacket
M. Extra VChange Sensors
N. Standoffs
O. Desktop charger power supply
E
B
O
E
G
D
J
A
C
K
F
H
L M
N
NI M

© Third Dimension Confidential Document D13-1604-OP-EN-3.3
V7.5 5
The clip on battery pack attaches onto the base
of the handle and provides power for additional
4-6 hours.
The Desktop charger will recharge the battery in
about 1.5 hours.
The VChange sensor system allows sensor heads
to be quickly and easily changed without using
any tools. The Vchange system can be retrofitted
to existing MX+ handles and sensors. Sensor
heads can be freely interchanged between
different handles.
To swap the sensor head squeeze the orange
release tabs on the Vchange collar and pull the
sensor off the handle. Push the new sensor into
place until the collar lock clicks. The sensor can
be swapped without turning off the GapGun.
The GapGun Pro has an internal battery which can
power the GapGun for 4 to 5 hours of normal use.
The battery can be recharged using the docking
station or via the clip-on battery which can be used to
extend the period of use by a further 4-6 hours.

6© Third Dimension Confidential Document D13-1604-OP-EN-3.3
V7.5
Some heads have a three position mask in front of the laser. Turning the laser cap changes the mask:
Position I places a mask line in the centre of the laser line. This artificially divides the laser line into a left and
right side. It can be used to measure features where it is difficult to identify the left and right sides
of a feature.
Position II is the default position which allows the full width of the laser line to be used.
Position III masks the laser on the right and left ends of the line presenting a shorter laser line on the feature.
The Docking Station connects the GapGun to the PC
though an Ethernet connection.
It also powers the GapGun, recharges the internal
battery and is a safe place to store the GapGun.
Standoffs are used in applications where the
parts being measured can’t possibly move. The
standoffs help stabilise the GapGun and position
it correctly.
The black V standoffs are for measuring gaps and
the grey H standoffs are for sealant beads.
I
II
III
III
II
I
I
II
III

© Third Dimension Confidential Document D13-1604-OP-EN-3.3
V7.5 7
Protect the GapGun by always using the Head
Jacket (above) and wrist loop.
Before each use: check lenses are clean, check
for any damage and verify calibration.
If the GapGun is dropped, check it for damage
and verify calibration.
The GapGun lenses need to be clean: Inspect the
highlighted areas for dust, grease or fingerprints;
clean them with the kit provided if required.
The GapGun Pro is designed for indoor use; keep
the system and its accessories dry and clean. Do
not use solvents on any surface.
Always verify calibration before use by measuring the Gauge Block or Pin Gauge supplied with your system. See
the Checking Head Calibration section in this manual for more details on running the Head Check checkplan.
FOV15/40/80 To perform a calibration check successfully, place the gauge block on a flat, stable surface.
Using the V-standoff, locate the tip in the gap to position the sensor at the correct distance
from the block.
FOV7 To perform a calibration check successfully. Using the V-standoff, locate the pin into the V
from the top of the standoff, taking care not to apply undue pressure to the pin.
NOTE: Failure to follow these steps may cause false calibration failures.
FOV 15 / 40 / 80 FOV 7

8© Third Dimension Confidential Document D13-1604-OP-EN-3.3
V7.5
A
B
C D
The SPC3D PC application is used to open Checkplans,
load Works Orders onto the GapGun and store the
measurements that are made.
A. Context-sensitive command ribbon.
B. Checkplan tree view.
C. Tabbed Properties, Results and GapGuns windows.
D. Tabbed Workspace, Checkplan and Live display.
1
This guide shows how use a Checkplan to verify
accuracy of the GapGun by measuring a calibration
block gauge or pin gauge.
It uses the pre-defined Calibration Checkplan. Open
this in SPC3D by selecting Open from the ribbon menu.
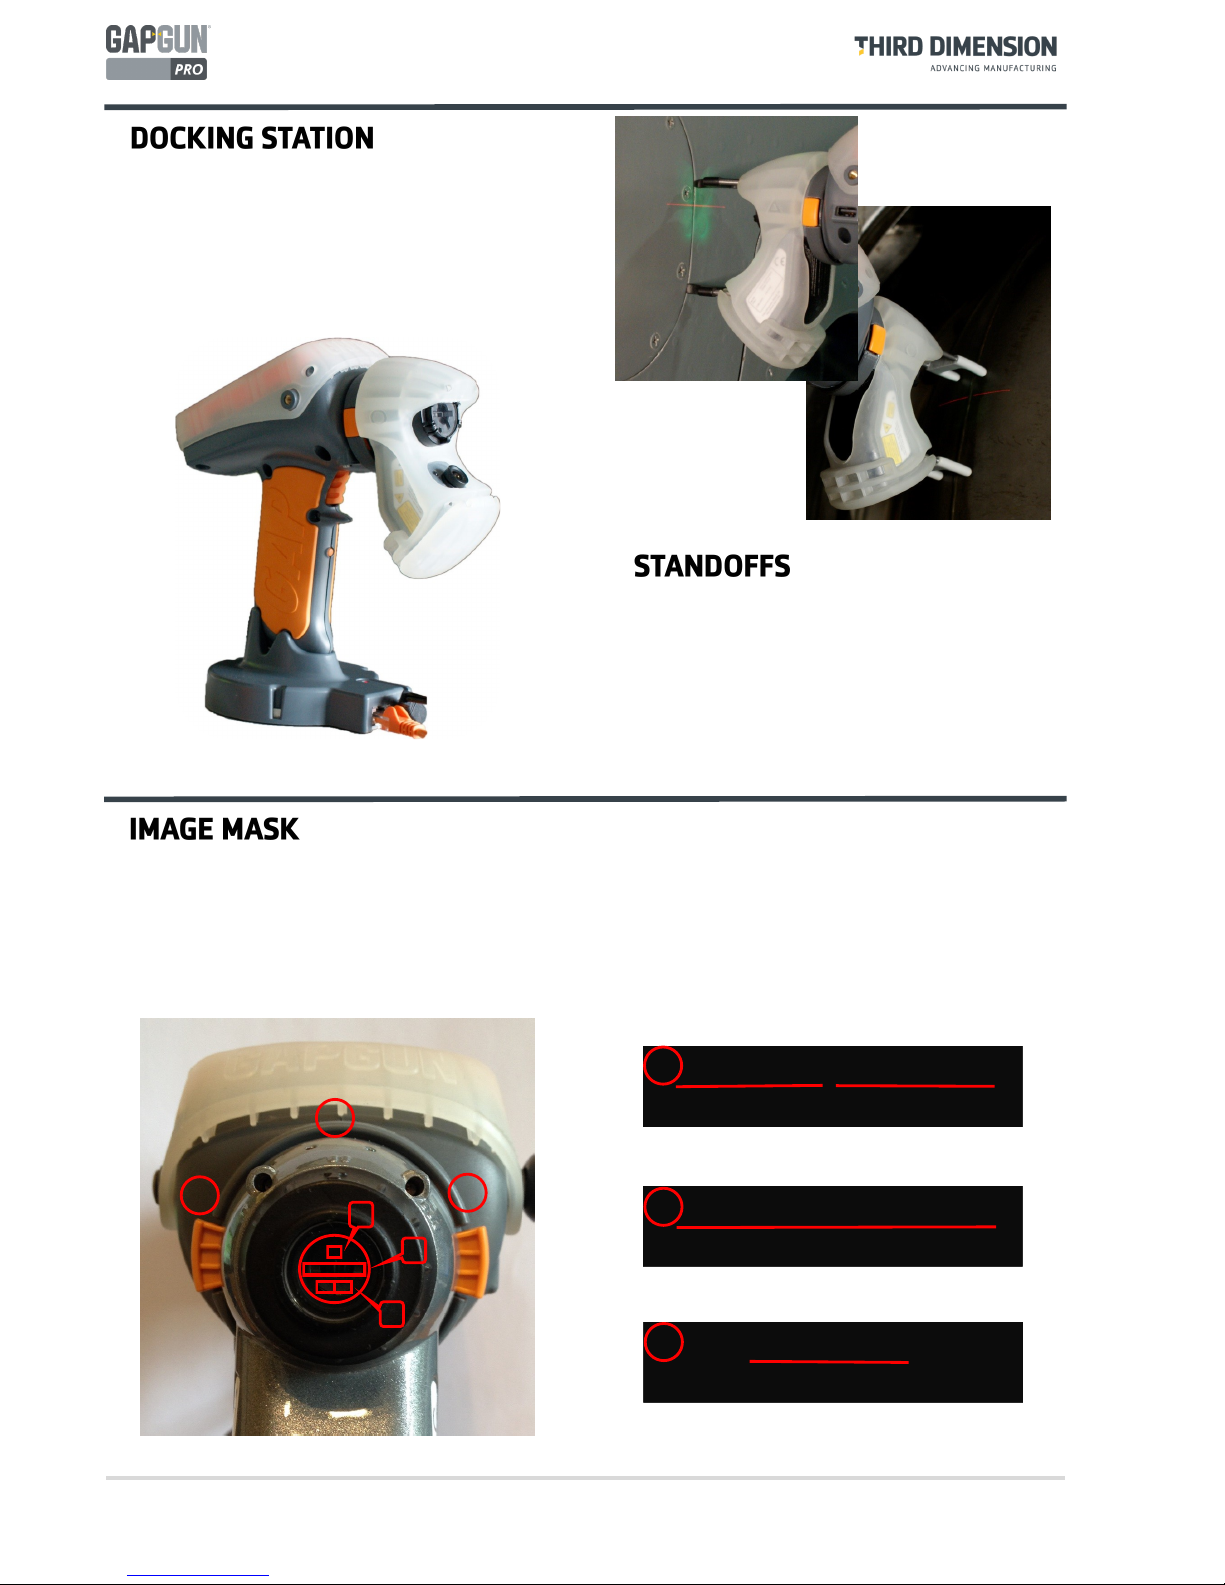
Place the GapGun onto the Docking Station.
The display will show the GapGun locating the SPC3D
host.
If Wi-Fi has been configured the GapGun will already be
connected.
2
When using the GapGun, it will have been
preconfigured to guide you through a sequence of
locations to scan (Features), each one has a picture, a
type of measurement (e.g. gap and flush) and a set of
tolerances.
This configuration is called a Checkplan, and an
instruction to measure a specific object with the
Checkplan is called a Works Order.
CHECKPLAN: Hex
SN: ####
GROUP: Gaps
1 Rounded
2 Square cut
3 Rounded square
GROUP: RADII
1 Radius
2 Twin Radius
CHECKPLAN: Hex
SN: 0001
GROUP: Gaps
1 Rounded
2 Square cut
3 Rounded
square
GROUP: RADII
1 Radius
2 Twin Radius
CHECKPLAN: Hex
SN: 0002
GROUP: Gaps
1 Rounded
2 Square cut
3 Rounded
square
GROUP: RADII
1 Radius
2 Twin Radius
CHECKPLAN: Hex
SN: 0003
GROUP: Gaps
1 Rounded
2 Square cut
3 Rounded
square
GROUP: RADII
1 Radius
2 Twin Radius

© Third Dimension Confidential Document D13-1604-OP-EN-3.3
V7.5 9
3 4
To navigate on the GapGun tap on an item to select that action or pull the trigger if the item is already selected.
To download a Works Order based on the Calibration Checkplan:
3. Tap on the “Download…” item. Note: If the “Download…” item is not shown then there is a problem
connecting the GapGun to SPC3D.
4. Tap on the SPD3D server that is to supply the checkplan.
5. Tap on the name of the Checkplan to be downloaded. The GapGun can now be undocked and clipped into the
Clip-on battery pack.
6. Tap the name of the Checkplan to start measuring.
5
7 8
By default, a Works Order gives a list of five Jobs to perform. This allows you to make measurements on five separate
parts (or five times on the same part.) For each Job just pulling the trigger will take you through the menus in the
right sequence.
7. Pull the trigger to enter the selected Job.
8. Enter the serial number of the part to be measured in this Job.
9. This menu shows Groups of Features for each type of GapGun head. Click on the one that matches your
GapGun head type.
10. Pull the trigger to measure each Feature using the following steps.
9 10
6

10 © Third Dimension Confidential Document D13-1604-OP-EN-3.3
V7.5
11. Start with the GapGun 10cm/4” away from the feature, then pull the trigger. If standoffs are being used then
locate them on the object and this will place the GapGun in the correct range immediately.
12. Aim the laser line at right angles across the feature. Move the GapGun closer keeping it perpendicular to the
feature. The arrows on the display show whether to move the GapGun towards or away from the feature.
13. When the GapGun is at the best position the green LEDs will appear. When the count reaches eight the
measurement is made. The measurement can be delayed by keeping the trigger pulled.
13
12
11
14. The GapGun should to be moved closer to the feature.
15. The GapGun should be moved away from the feature.
16. The green LEDS will be lit and the counters will start to turn green. “Trigger Lock” is displayed when
measurement has been delayed by pulling the trigger.
17. When the counters all turn green the GapGun will beep and the measurement will be made.
If “Measurement Failed” is shown try again, however this may mean that the wrong virtual tool is being used.
14 15 16 17
Andere Handbücher für GapGun Pro
1
Inhaltsverzeichnis
Andere Third Dimension Messgerät Handbücher


