
Concept Pro VXH264D-16 Bedienungsanleitung

HOLD
RW
.
ZOOM
OUT
FF
.
ZOOM
IN
NEAR FAR CLOSE OPEN
FOCUS IRIS
DISPLAY SEQ PANIC
ZOOM LOCK ARCHIVE
PTZ SETUP SEARCH
RETURN ENTER
!
±
+
1 2 3 4 5 6 7
8 9 10 11 12 13 14 15 16
PWR REC NET
H.264
16 Channel Digital Recording System
User Manual
VXH264D-16

CONTENTS
B for installing 1
K y f atur s 2
Front pan l d scription 3
R ar pan l d scription 4
G tting start d 5
Connect an switch on 6
Configuring th liv display 7
Multi-screen mo e 7
Choosing channels 7
Digital zoom 8
Log 8
Playback 9
Search 9
Event Search 11
Search by POS Event 12
Archiving 13
T l m try Control 15
K y lock function 15
Panic r cording 15
S qu nc mod 15
Shutdown 15
Quick M nu 16
Configuring th VXH264D – Syst m S tup 17
Cam ra 17
Au io 18
Colour Setup 18
PTZ Setup 18
Motion Sensor 19
Area Setup 19
Display 21
OSD 21
Monitor 21
Sequence 22
Spot Out 23
POS 24
Sound 24
Au io 24
Buzzer 24
Syst m 25
Date / Time 25
System Management 25
Control Device 26
POS Setup 26
Us r 27
Management 27
Authority 28
Log-out 28
N twork 29
IP Setup 29
DDNS 29
E-mail 29

CONTENTS
Ev nt / S nsor 30
HDD Event 30
Alarm Input 30
Alarm Out 30
Buzzer Out 31
Email Noti 31
PTZ Preset 31
Disk Manag 32
R cording 32
Continuous / Motion S tup 33
Siz / FPS / Quality 33
Sche ule 34
Alarm s tup 36
Panic s tup 36
N twork Str aming 36
Conn cting to th VXH264D r mot ly 37
Connect using Internet Explorer 37
How to connect 37
R mot cli nt controls 39
Using th r mot cli nt 40
Live isplay mo es 40
Au io monitoring 40
Au io talkback 40
Saving to AVI file 41
Status 41
Log 41
PTZ 42
R mot cli nt playback controls 43
Controlling playback 44
Au io monitoring 44
Backup 45
Search by event 45
Print an image 45
R mot VXH264D s tup 46
Entering setup 46
Loa ing an saving 46
VXH264D Mobil APP 47
VXH264D Smart Phon R mot Vi wing 49
App ndix A: Th Archiv S t 50
Backup play r 50
Controls 51
App ndix B: Configuring a N tg ar DG834
rout r for us with th VXH264D 52
App ndix C: Conn cting xt rnal d vic s 55
App ndix D: Sp cifications 56

1
BEFORE INSTALLING
BEFORE IN TALLING
• Installation should be carried out only by qualified personnel and in accordance with electrical
regulations in force.
• The DVR must be placed on a stable surface or mounted in an approved cabinet. Adequate
ventilation must be provided, taking particular care not to block any of the air vents on the DVR.
• Adequate protection against lightning strikes and power surges must be installed to prevent
damage to the DVR.
• Any safety warnings on the DVR and in these instructions must be adhered to.
• If cleaning is necessary, shutdown the DVR and disconnect the power source first. Use a soft dry
cloth only – never use an abrasive cleaner.
• Do not attempt to service or repair the DVR as opening or removing covers may expose
dangerous voltages or other hazards. Refer all servicing to qualified service personnel.

2
KEY FEATURES
ENHANCED GRAPHICAL U ER INTERFACE (GUI)
The VXH264D menu structure nd on-screen displ y is presented in simple to use nd logic l GUI form t.
ENHANCED RECORDING
Any oper tion performed on the VXH264D will not ffect the recording including loc l pl yb ck, loc l set-up, multi-user
remote viewing nd pl yb ck, remote setup nd rchiving.
TWO-WAY AUDIO
4 udio inputs re supported which c n be ssigned to ny video ch nnel. Live nd recorded udio c n be monitored
remotely over the internet nd remote udio tr nsmission for PA bro dc st on-site is supported. The viewer c n he r the
udio from the c mer they re viewing on full-screen.
REMOTE CONNECTION
Web connection is provided using st nd rd browser e.g. connection for up to 4 VXH264D units in one session. Depending
on the user level, full control of the VXH264D is v il ble over the internet s well s the bility to remotely configure the
VXH264D.
The VXH264D llows remote log-on users to see the current st tus of the recorder by showing:
“C” continuous, “M” Motion, “A” Al rm, “R” Rel y out, “P” P nic.
ARCHIVE
Recorded foot ge (including udio) c n be rchived to USB memory stick, CD or DVD. Pl yb ck softw re is embedded
with the b ck-up files nd the b ck-up lso cont ins the system event log nd b ck-up log for full tr ce bility. S ve your
setup to USB to m ke future inst ll tions even more simple nd time efficient.
COMPREHEN IVE RECORDING ETUP
Recording c n be scheduled, l rm ctiv ted or motion ctiv ted. For e ch type of recording, fr me r tes, im ge qu lity
resolution nd udio recording properties c n be djusted, per hour, per d y nd for e ch individu l ch nnel. The VXH264D
lso h s p nic recording fe ture (from the front p nel or extern l input) which overrides ll other recording settings to
provide the best qu lity recording in the event of n emergency.
TELEMETRY CONTROL
Full telemetry control is v il ble from the front p nel or remote connection with wide number of speed dome protocols
supported. Protocols c n be set individu lly for e ch ch nnel nd telemetry speed c n be djusted to suit p rticul r speed
domes. The telemetry will llow more th n one c mer to go to preset from n l rm ctiv tion.
EXTEN IVE MONITOR UPPORT
The VXH264D h s 4 m in monitor outputs (Composite, VGA, S-Video nd HDMI). The VXH264D is provided with 4 spot
monitor outputs. E ch spot monitor output c n be progr mmed in the VXH264D set-up.
LIVE DI PLAY
The VXH264D displ ys single or multi-screen im ges nd h s sever l sequence modes (st nd rd nd user defin ble).
CONFIGURATION BACKUP
All configur tion settings on the VXH264D c n be s ved to USB memory stick or PC file remotely. The s ved d t c n then
be uplo ded to other VXH264D units llowing r pid deployment where more th n one VXH264D is being inst lled.
EMAIL UPPORT
The VXH264D c n send em ils to specific users to notify events such s l rm ctiv tion, motion detection, setup ch nges,
h rd drive f ilure.
JOG HUTTLE
The Jog / Shuttle wheel provides precise pl yb ck control on the VXH264D nd llows 1x - 64x pl yb ck speeds in forw rd
or reverse pl y nd fr me by fr me dv nce.
REMOTE U ER IP ADDRE LOGGED
The IP ddress of ny remote log-on ctivity c n be shown s p rt of the ctivity log.
KEY FEATURE

3
FRONT PANEL DESCRIPTION
HOLD
RW
.
ZOOM
OUT
FF
.
ZOOM
IN
NEAR FAR CLOSE OPEN
FOCUS IRIS
DISPLAY SEQ PANIC
ZOOM LOCK ARCHIVE
PTZ SETUP SEARCH
RETURN ENTER
!
±
+
1 2 3 4 5 6 7
8 9 10 11 12 13 14 15 16
PWR REC NET
USB ports
Supports a wide
variety of USB
memory stick for
archive, system
setting backup and
firmware upgrade.
An additional USB
port is also
provided on the
rear panel
CURSOR KEYS,
ENTER and
RETURN buttons
Used for navigating
setup menus, search
and archive screens.
Also used when the
VXH264D is in PTZ
mode (page 15)
CHANNEL SELECTION
BUTTONS
Used to display individual
channels in live display and
playback (page 7 & page 9)
Also used to enter numeric
passwords for the various
login screens
Increases reverse playback speed
Selects reverse playback
Pauses / resumes playback
Selects forward playback and also
accesses the instant playback
feature
Increases forward playback speed
SHUTTLE WHEEL
Used to quickly adjust
playback speed and direction
(page 10). It is used to control
camera zoom when in PTZ
mode (page 15), and digital
zoom level in live display
(page 8)
JO RIN
When playback is paused,
the jog ring is used to move
footage forwards or
backwards, frame by frame
(page 10)
HOLD
Locks the current function of
the SHUTTLE WHEEL so it
can be released (page 10)
POWER BUTTON
(page 6 & page 15)
DISPLAY
Selects various display
modes in live display and
playback (page 7 & page 9)
SEQ
Calls the currently defined
sequence mode (page 15)
PANIC
Selects panic recording mode
(page 15)
ZOOM
Selects digital zoom mode in
live display (page 8)
LOCK
Locks the front panel buttons
(page 15)
ARCHIVE
Displays the archive menu
(page 13)
PTZ
Selects PTZ mode in live
display (page 15)
SETUP
Displays the setup menus
(page 17)
SEARCH
Displays the search menu
(page 9)
SYSTEM CONTROL KEYS

4
REAR PANEL DESCRIPTION
HD MONITOR
PAL
NTSC
SD
VGA
HD
ALARM IN + ARI / PANIC
e-SATA
ARI PANIC NO COM NC NO COM NC NO COM NC NO COM NC
485 +
485 -
GND
485 +
485 -
100-240V AC, 50/60HZ
1
CAMERA INPUTS and
LOOP OUTPUTS
Connect up to 16 camera inputs
Loop outputs can be used for
connection to other equipment
COMPOSITE AND S-VIDEO
MAIN MONITOR
CONNECTIONS
Monitor Outputs to connect o a
monitor. Both the COMPOSITE
and S-VIDEO outputs can be
used simultaneously
SPOT MONITOR
OUTPUTS
Up to 4 spot
monitors can be
connected as
necessary
AUDIO INPUTS
& OUTPUTS
Up to 4 audio
inputs and one
audio output can
be connected as
necessary
ALARM INPUTS
Up to 16 alarm
inputs can be
connected and
configured as high
or low inputs with
common ground
ALARM
OUTPUTS
Up to 16 alarm
outputs can be
connected and
configured as
high or low
outputs with
common ground
DIP SWITCH
Select the monitor
output by changing
the DIP SWITCHES.
Please note: This
will only take effect
when the DVR is
rebooted.
HDMI / V A
HDMI/V A main
monitor
connection to a
PC monitor or
HDMI screen.
SERIAL PORT
RS232 Serial Port is
not used. It is for
factory use only
RELAY OUT
Up to 4 NO - NC
zero voltage
connecions can be
made
RS485
Connection to
external
telemetry
devices
LAN
LAN connection
to a router or
internal network
POS
Connection to
external Till
System
PANIC / RESET
Panic Button &
Alarm Reset

5
GETTING STARTED
PLEASE NOTE: ALL NECESSARY CONNECTIONS MUST BE MADE BEFORE APPLYIN POWER TO THE VXH264D!
THE VXH264D IS PRE-CONFI URED WITH THE FOLLOWIN SETTIN S:
25FPS continuous recording rate per channel at D1 (704 x 576) resolution and standard image quality.
• Time and date set to correct local time
• Audio inputs 1-4 assigned to video channels 1-4 respectively
• Telemetry devices set to PELCO-D, 2400 Baud
• Based on average image recording, the above settings will provide around 11 days recording on a 2Tb drive
before the footage starts to be overwritten.
POWER
System ON/OFF
ID BUTTON
Select DVR ID
RETURN
Cancel / Deselect
Previous Screen
SETUP: Open system setup menu
Channel Selection buttons
ENTER: Apply / Select / o to next screen
DISP: Change display screen
SEARCH: o to search mode
PTZ: o to PTZ menu
PANIC: Record by panic setting
KEYLOCK: Lock the keys (Remote / Front)
SEQUENCE: Change to sequence screen
ZOOM: o to zoom mode
ARCHIVE: o to back-up menu
* If there are multiple DVRs used in a system, each DVR can be set with a different ID. The remote controller sets each ID per DVR. This allows
all the DVRs to be controlled with one remote controller by selecting the appropriate ID.
HOW TO SET THE ID ON THE RE OTE CONTROLLER
Program each DVR accordingly to system ID (see page 26 )
Press the ID button, this will display “INPUT ID” on screen.
Using the channel selection buttons, input the system ID, press “ENTER” then the “RETURN” button
To reset the ID to factory default, press the ID button and input ID 255 and press the “ENTER” button followed by pressing the
“RETURN” button.
Please note your VXH264D can be controlled via the front panel buttons, IR remote control or a USB mouse.
When a USB mouse is installed an on-screen pointer will appear. This can be used to navigate the system.
NAVI ATION BUTTONS: Used for Playback
Control, Menu Naviagtion, and PTZ/Focus
Control
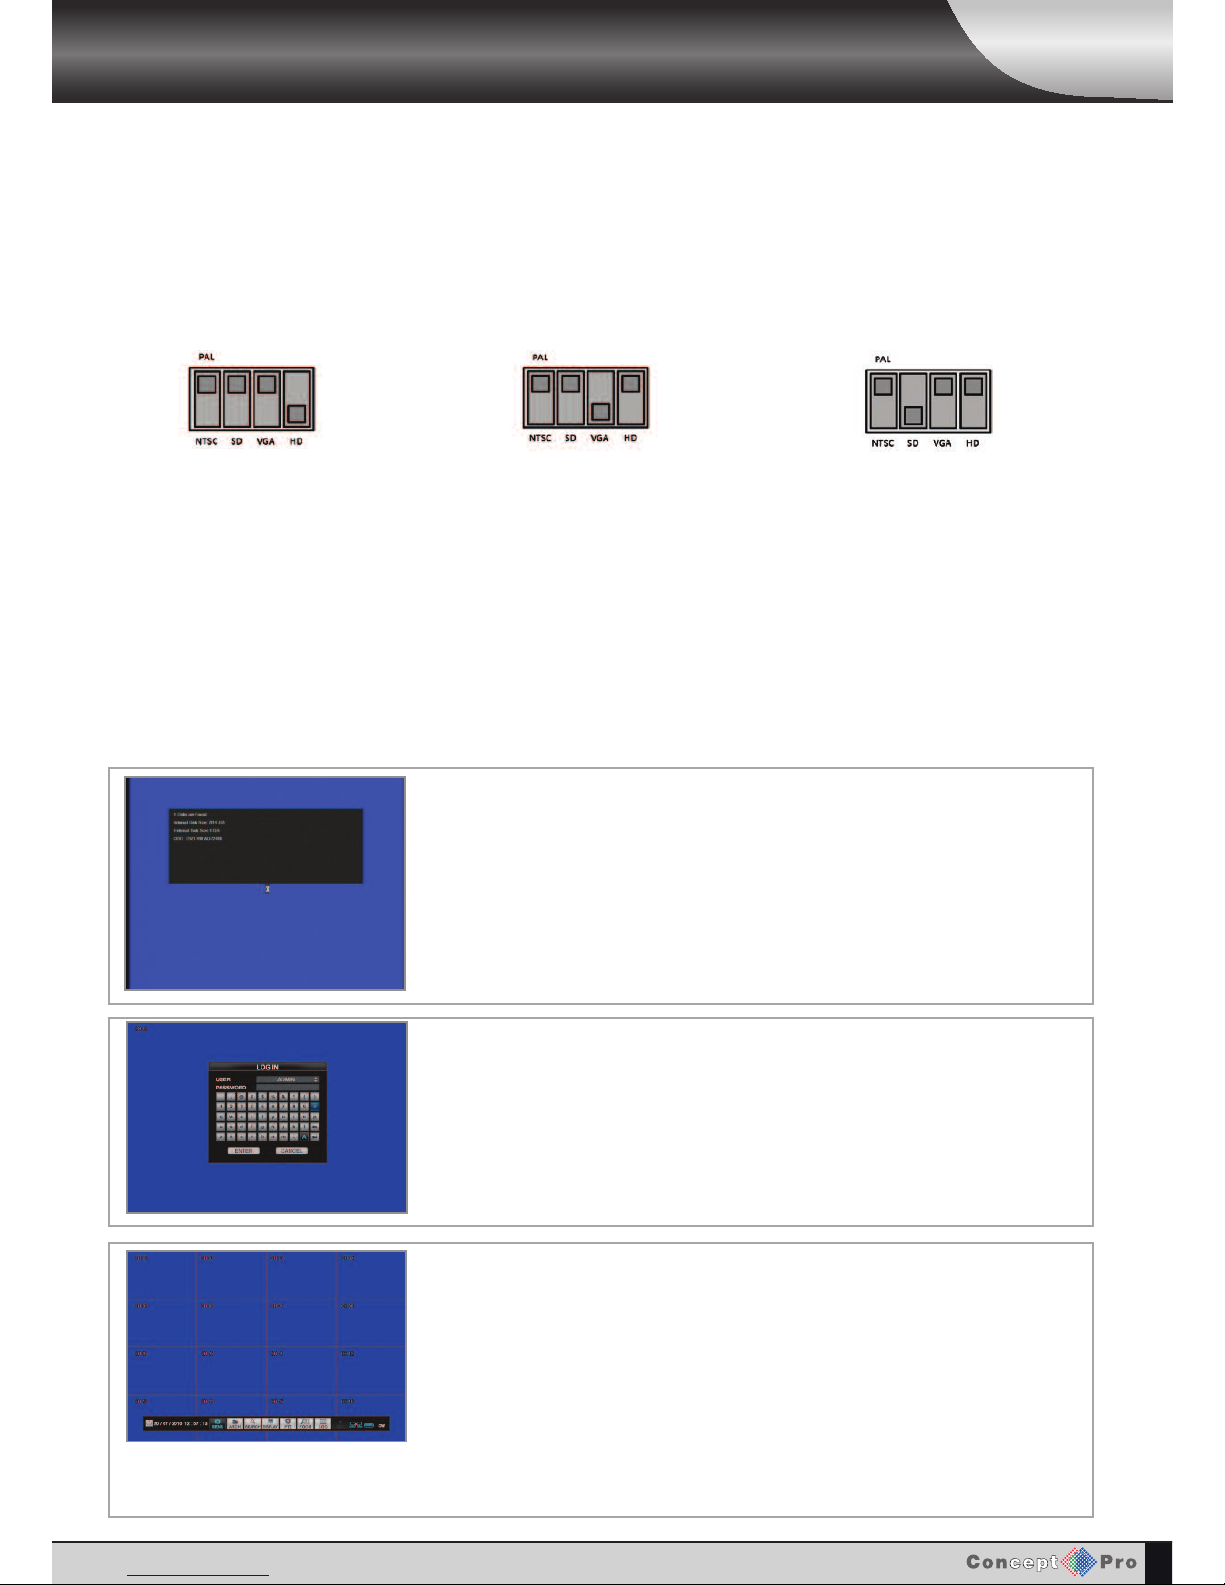
6
GETTING STARTED
The VXH264D startup screen detects and checks the status of hard drives and the
CDRW / DVR-RW drive
After startup diagnostics are complete, the operator must log-on to the system. The
default user name is ‘ADMIN’. Using the CHANNEL SELECTION buttons, key in
the default password of ‘1234’ and press the ENTER button
The VXH264D begins normal operation and shows the default display of all 16
channels.
The status bar at the bottom of the screen shows current time and date. The status
bar includes Menu, Archive, Search, Display, PTZ & Zoom control along with the
‘Log’.
A title for each channel is shown
The red square and letter ‘C’ in the top right of each channel display shows that the
channel is recording in Timer / Schedule mode.
If audio recording is enabled, an audio icon showing 1,2,3 or 4 is displayed.
CONNECT AND SWITCH ON
• Connect up to 16 CAMERA INPUTS. The VXH264D also has LOOP OUTPUTS so that any signals
can be fed to other equipment if required. Termination is automatically set by the VXH264D depending on
connection type
• Using the Dip Switches on the back of the VXH264D, select the monitor out you are connneting
To select the HDMI monitor output To select the V A monitor output To select the Standard definition output
Please note when HDMI or V A outputs are selected only the selected monitor type can be viewed, if standard
definition output is selected both Composite and S-Video can be viewed simultaneously.Only once the DVR has been
rebooted will the dip switch settings have affect.
• Connect one or more monitors to the VXH264D using the COMPOSITE, V A, S-VIDEO OR HDMI connections
• Connect power to the VXH264D. The VXH264D checks for proper power connection and emits a beep. Press the
POWER BUTTON on the front panel of the VXH264D to begin operation.

7
CONFIGURING THE LIVE DISPLAY
MULTI CREEN MODE
6 different display modes are supported by the 16 channel VXH264D.
By repeatedly pressing the DISPLAY button, the operator can choose between single, 4, 6,
8, 9, and 16 screen as well as basic sequence modes.
All the display modes are static with the exception of the sequence mode. In this mode, the
sequence symbol ( ) is displayed and each channel is shown in full screen for a set period
of time (default 5 seconds) before switching to the next channel. The sequence runs
indefinitely until a different display mode is chosen.
To view a particular channel in full screen, press the corresponding CHANNEL
SELECTION button.
Pressing the same CHANNEL SELECTION button again will switch the display back to
the last selected multi screen mode.
If audio recording is enabled for a selected channel, the chosen audio source is
automatically played when that channel is viewed in full screen.
CHOO ING CHANNEL
Inhaltsverzeichnis
Andere Concept Pro DVR Handbücher

Concept Pro
Concept Pro HD-iP LITE VHDIPL-32-4 Bedienungsanleitung

Concept Pro
Concept Pro H.264 Bedienungsanleitung

Concept Pro
Concept Pro VXH5AHD-4 Bedienungsanleitung

Concept Pro
Concept Pro VXH5AHDE-8 Bedienungsanleitung

Concept Pro
Concept Pro VXM4-4 Bedienungsanleitung

Concept Pro
Concept Pro VXM4-RT16 Bedienungsanleitung

Concept Pro
Concept Pro VXM4-16 Bedienungsanleitung

Concept Pro
Concept Pro VXH960-4 Bedienungsanleitung

Concept Pro
Concept Pro VXH5AHDL-4 Bedienungsanleitung

Concept Pro
Concept Pro VXH264-4 Bedienungsanleitung


