LAVAZZA LB3200 Colibri Bedienungsanleitung

Installation requirements
BLUEPOD TECHNICAL SERVICE Tel: 1800 800 255 Email: technical@bluepod.com.au
Copyright Bluepod Coffee Co Pty Ltd Page 1 of 1
LB3200 Colibri DATE OF ISSUE: 07/02/2011
NFOR
Plumbing
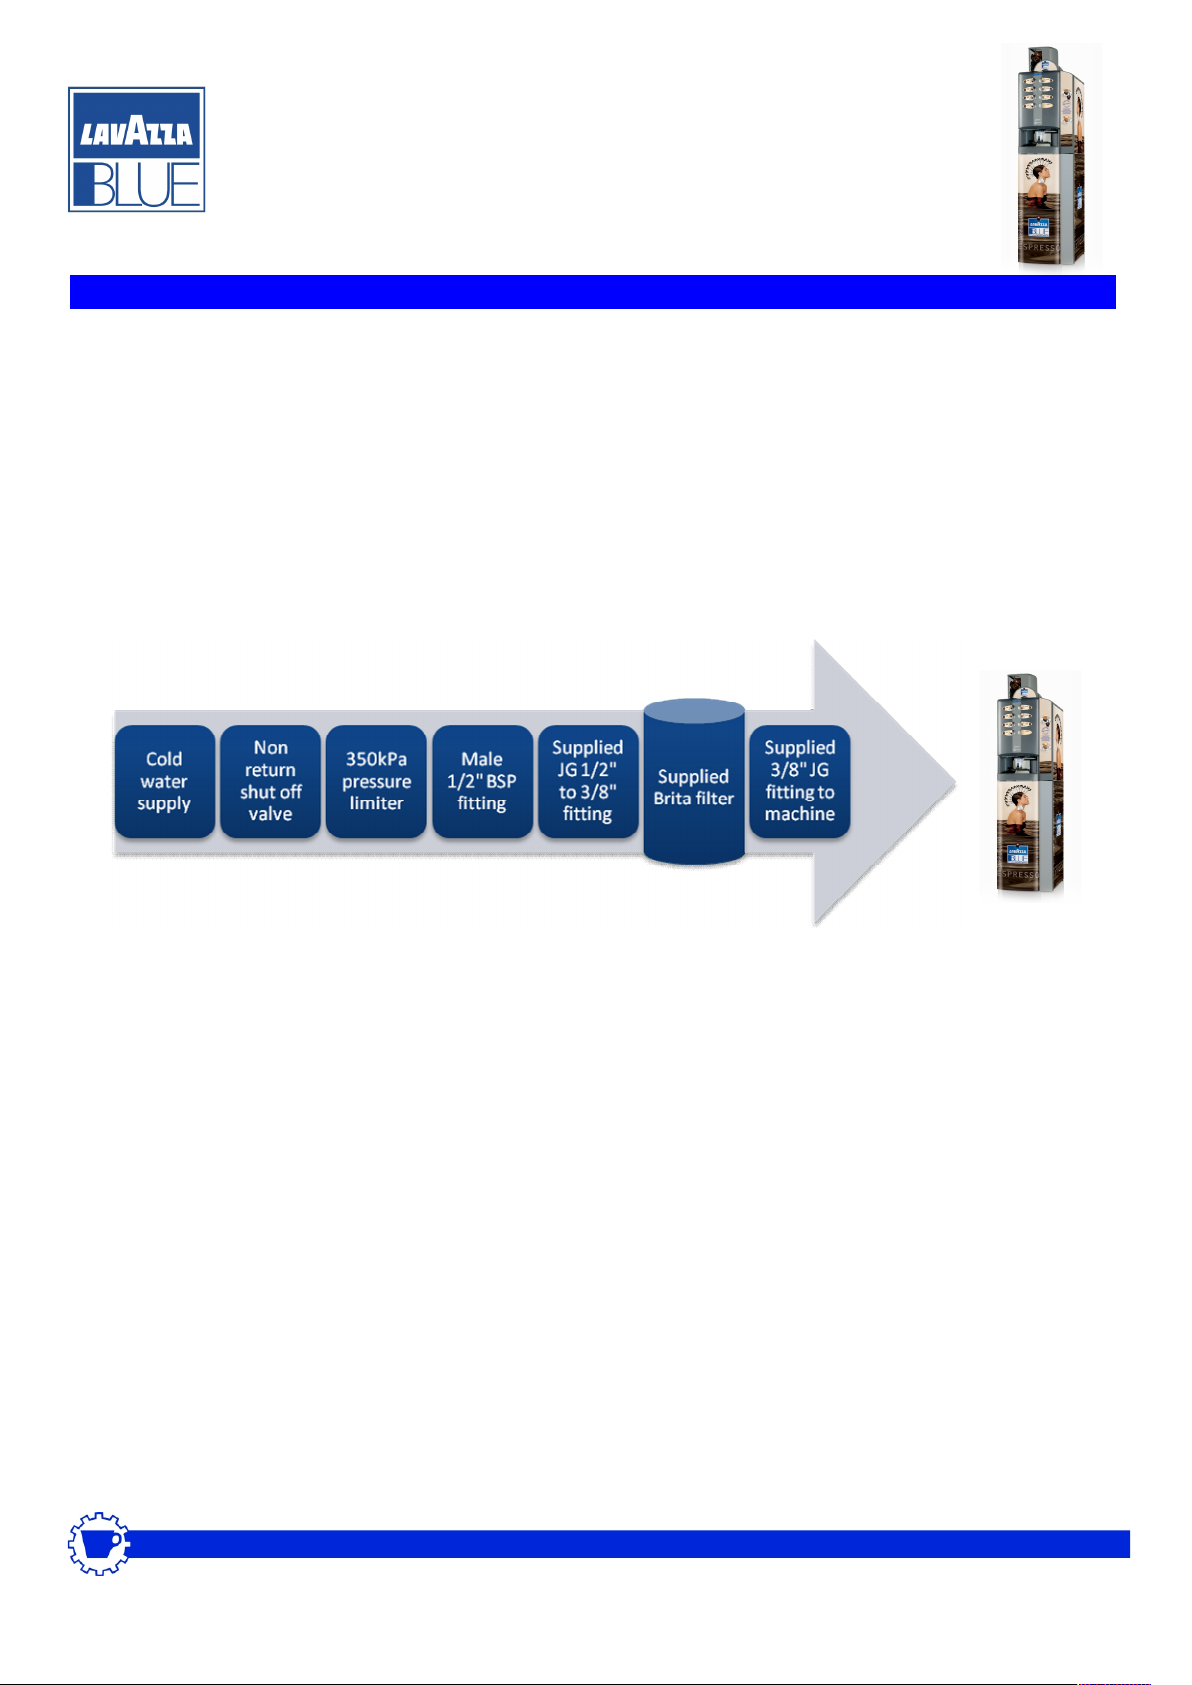
There are 2 plumbing configurations, mains fill and tanked supply:
1: Mains fill
The mains option requires a cold drinking water supply within 2m. This should be from an accessible, non
return, water shut off tap fitted with a 1/2” BSP male fitting. 2m of John Guest water line is supplied which is
cut as needed for the supply to the machine.
2: Tank fill
The tank option needs only electrical power. Be aware if a base cabinet is required, the water tank will need
locating externally if a changegiver is fitted. For a base unit with a coin acceptor, the tank is fitted inside the
base cabinet.
Electrical
The only electrical requirement is for a 10A switched socket to be within 2m of the machine location

Installation and Setup
BLUEPOD TECHNICAL SERVICE Tel: 1800 800 255 Email: technical@bluepod.com.au
Copyright Bluepod Coffee Co Pty Ltd Page 1 of 12
LB3200 Colibri DATE OF ISSUE: 27/01/2011
NFORMATION NO: 007
Self Fill Lavazza Colibri with changegiver
Congratulations on choosing to drink great coffee using the unique Lavazza pod vending system.
The machine is easy to use. Follow the simple steps listed here and your organization will enjoy
great tasting coffee every day.
If you need assistance at any point, please call 1 800 800 255 or visit our self help troubleshooter
at www.bluepod.com.au/support
Before proceeding, please note the machine should NOT be powered up until instructed.
The boiler may be damaged and require a replacement machine sent out.
Installation and Setup
BLUEPOD TECHNICAL SERVICE Tel: 1800 800 255 Email: technical@bluepod.com.au
Copyright Bluepod Coffee Co Pty Ltd Page 2 of 12
LB3200 Colibri DATE OF ISSUE: 27/01/2011
Initial installation
Each customer is aware before delivery of requirements for plumbing and power.
Mains supply
Locate all parts for your configuration as listed above. Connections between these components are
to be made using the blue John Guest water line included. 2m is supplied in the base cabinet, cut
to length as needed.
The 3/8” to 3/4” female fitting for the rear water connection to the machine will be packed inside
the top cabinet within the small grey drawer on the lower right side. The yellow plastic service key
and round bottom cabinet key will also be found there.
All other JG fittings are mounted ready for use.

Installation and Setup
BLUEPOD TECHNICAL SERVICE Tel: 1800 800 255 Email: technical@bluepod.com.au
Copyright Bluepod Coffee Co Pty Ltd Page 3 of 12
LB3200 Colibri DATE OF ISSUE: 27/01/2011
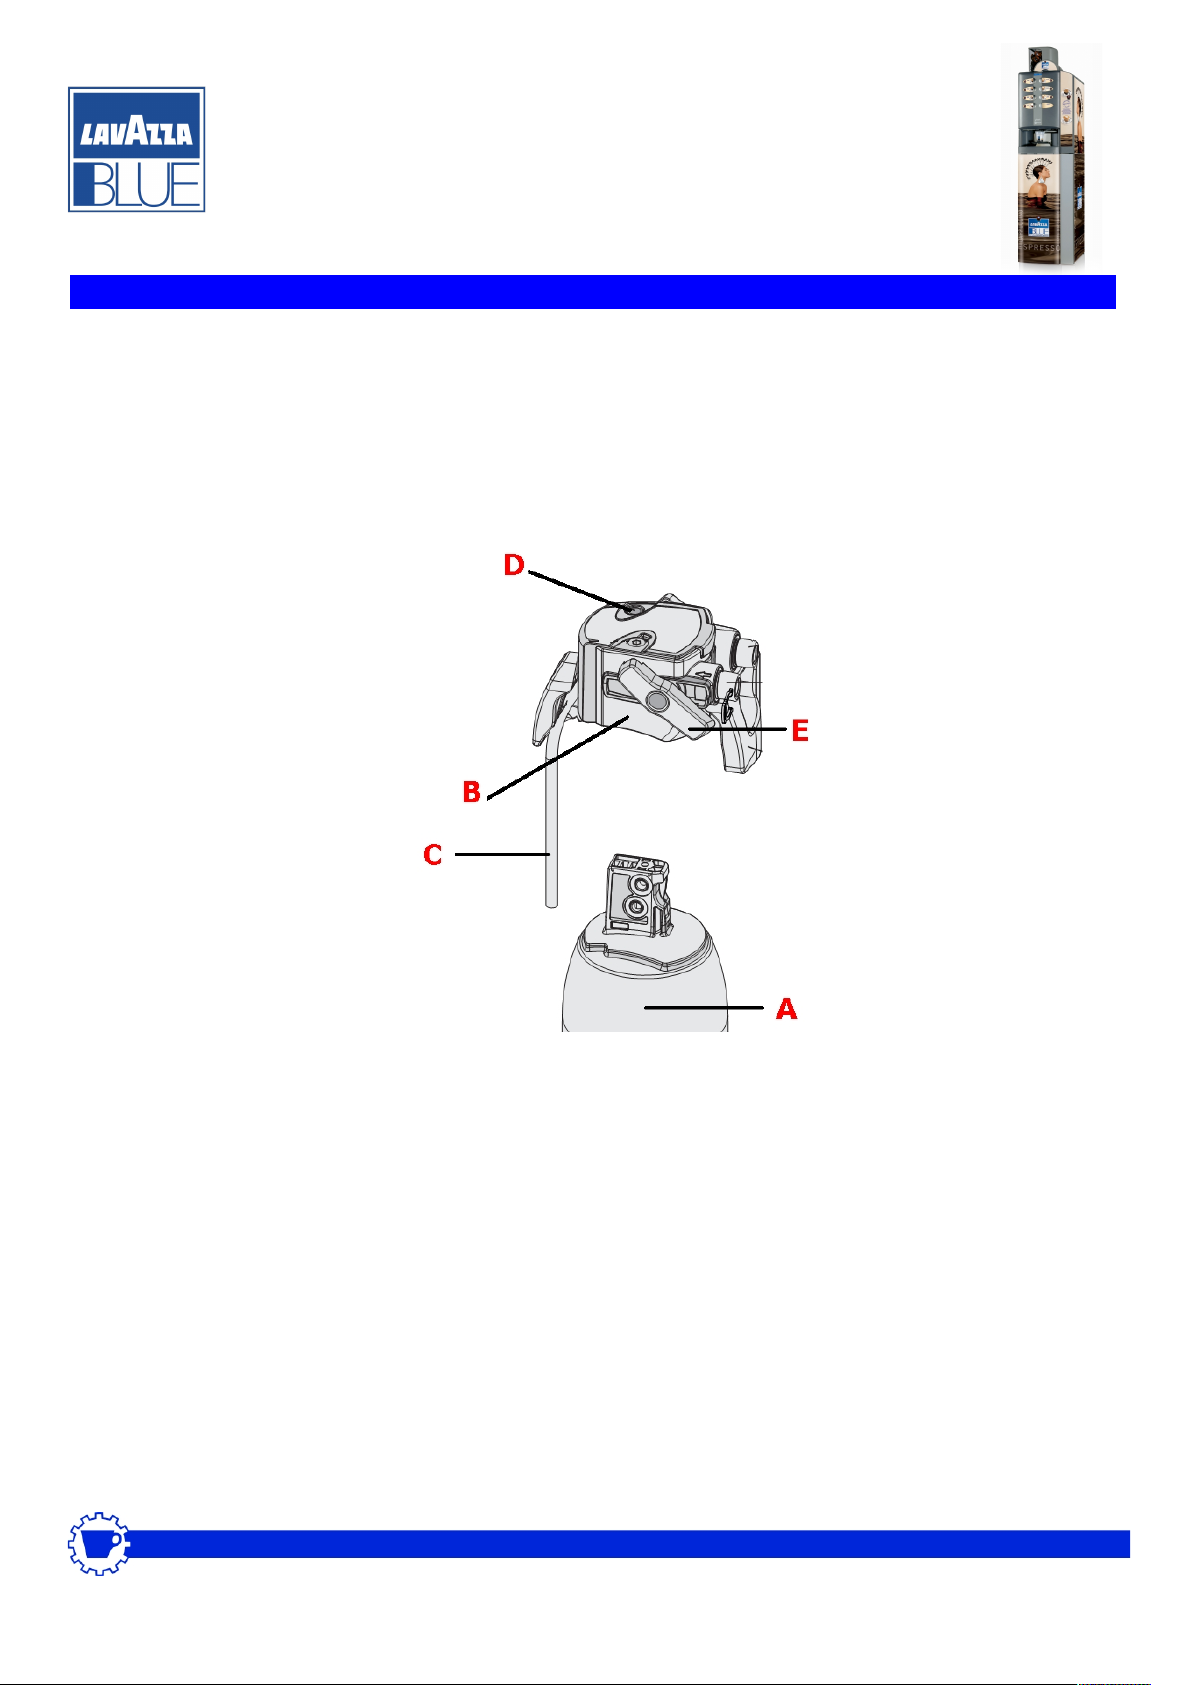
1. Plan the installation. In particular, the Brita filter (A) supplied must be used to ensure
the long term reliability of the machine.
2. The filter must be located between the mains water outlet and the machine.
3. Your machine has a metal base cabinet. Provision is built in for mounting the filter via 2
screws prefitted using its mounting bracket.
For example, see Brita filter unit (B) installed on the rear of the cabinet between mains
supply (C) and coffee machine inlet (A):
Installation and Setup
BLUEPOD TECHNICAL SERVICE Tel: 1800 800 255 Email: technical@bluepod.com.au
Copyright Bluepod Coffee Co Pty Ltd Page 4 of 12
LB3200 Colibri DATE OF ISSUE: 27/01/2011
4. The filter must be flushed before use. This is achieved using the small grey rubber
discharge hose inside the filter head unit (C). Remove this from its storage location in-
side the head (B) before mounting. The filter head is removed from the filter body by
rotating the lock handle (E) observing the padlock symbols on the side. When the grey
tube is free, refit the filter head on the filter, paying attention to the 3 o rings on the fil-
ter body that must remain in place. Rotate the lock handle to the lock position.
5. Place machine and filter/mount bracket in their final positions. Secure the mounting
bracket with screws/bolts. Cut and push fit the supplied blue JG water line as required
from the mains water connection.
6. Turn on the water supply and check for leaks.
7. Flush/purge air from Brita filter. This is achieved by placing the grey rubber discharge
tube (C) into a jug/bucket and gently depressing the flush button (D) on the filter head
until the water flowing out is steady and clear.
8. Once the water circuit is complete and free from leaks and flushed, proceed with the
setup but at this point, do NOT supply electrical power the machine.

Installation and Setup
BLUEPOD TECHNICAL SERVICE Tel: 1800 800 255 Email: technical@bluepod.com.au
Copyright Bluepod Coffee Co Pty Ltd Page 5 of 12
LB3200 Colibri DATE OF ISSUE: 27/01/2011
Initial Setup after installation
1. Ensure the electricity supply is OFF and the water supply is ON
2. Machines are supplied with a Brita water filter, this must be fitted and flushed
before using the machine. Do not proceed further until this is carried out.
3. Open the top main machine door.
4. The 2 grey lids on the top of the machine can now be opened. They are used to fill
the coffee and milk/chocolate canisters. These lids cannot be opened with the door
closed.
5. The left lid is the coffee pod hopper lid. Fill the hopper with coffee pods, it takes up
to 140. Leave at least 2cm clearance from the top. DO NOT FORCE PODS IN.
The pods need space to sort within the hopper. Do not drop cardboard pieces from
the pod box into the hopper, they can jam the pod mechanism.
6. The milk and chocolate compartments on the right side of the pod hopper will take
up to a bag of product each. Fill with product. Do not overfill as the lid will not
close and the machine will not operate.
7. Rotate the sugar /stirrer mechanism outwards to access the sugar container (1)
Lift the lid and fill using normal sugar. Do not use castor sugar.
Installation and Setup
BLUEPOD TECHNICAL SERVICE Tel: 1800 800 255 Email: technical@bluepod.com.au
Copyright Bluepod Coffee Co Pty Ltd Page 6 of 12
LB3200 Colibri DATE OF ISSUE: 27/01/2011
8. Remove the metal bar from the stirrer mechanism (2).Slide a pack of wrapped
stirrers in. Place a finger on top of the stirrer pack. While applying light pressure,
tear and remove the paper band completely. Replace metal weight on top of stirrers.
Rotate and clip the unit gently back into its original position.
9. Insert 3stacks of paper cups into the grey carousel on inner side of main door. Do
not fill the tube directly above the cup dispensing arm. The cup carousel can
be tilted towards you to access the tubes by lifting slightly then tipping outward.
10. Fill the cup tubes from the top. Do not fill above the top of the carousel. This will
damage the cups and the door will not close. Only use cups supplied by Blue Pod,
they made specially to work in this machine.

Installation and Setup
BLUEPOD TECHNICAL SERVICE Tel: 1800 800 255 Email: technical@bluepod.com.au
Copyright Bluepod Coffee Co Pty Ltd Page 7 of 12
LB3200 Colibri DATE OF ISSUE: 27/01/2011
11. Open the lower metal base cabinet door with the round key, ensure the clear plastic
drip tray hose (A) and waste container float/chain (B) are placed within the white
waste water container (C)
12. Close the bottom door, store the key safely then close the top door. Switch on the
mains electricity supply. The front LCD will power up and the machine will run a
short diagnostic program. Water may flow from the dispensing nozzles; this will run
into the drip tray/waste container.
13. “Temperature” should appear on the LCD display for some minutes after which it will
show “Ready for use”. Make 1 hot chocolate and 1 cappuccino and discard. These
will prime the powder conveyers.
14. Your machine is now setup and ready. Enjoy a drink! You may select short black,
long black, cappuccino, latte, mokaccino, hot chocolate or hot water.

Installation and Setup
BLUEPOD TECHNICAL SERVICE Tel: 1800 800 255 Email: technical@bluepod.com.au
Copyright Bluepod Coffee Co Pty Ltd Page 8 of 12
LB3200 Colibri DATE OF ISSUE: 27/01/2011
Daily Action
1. Check/refill pods in the hopper.
2. Check/refill the powder canisters as necessary.
3. Check/refill cups and stirrers.
4. Clean the drip tray by removing, wash and reinsert.
5. Clean and wipe the exterior.
6. Ensure LED display reads “Ready for use”
If the machine needs refilling, take the opportunity to perform the weekly cleaning
procedure while the machine is open. It takes only 5-10 minutes.

Installation and Setup
BLUEPOD TECHNICAL SERVICE Tel: 1800 800 255 Email: technical@bluepod.com.au
Copyright Bluepod Coffee Co Pty Ltd Page 9 of 12
LB3200 Colibri DATE OF ISSUE: 27/01/2011
WEEKLY CLEANING CYCLE
The following should be carried out each week (or more often at busy sites) to maintain the high
reliability of the machine:
1. Open the machine door, place the yellow service key into the slot at the top centre of
the machine, and turn the key 90 degrees clockwise. This will restore power to the ma-
chine and the machine will now operate with the door open.
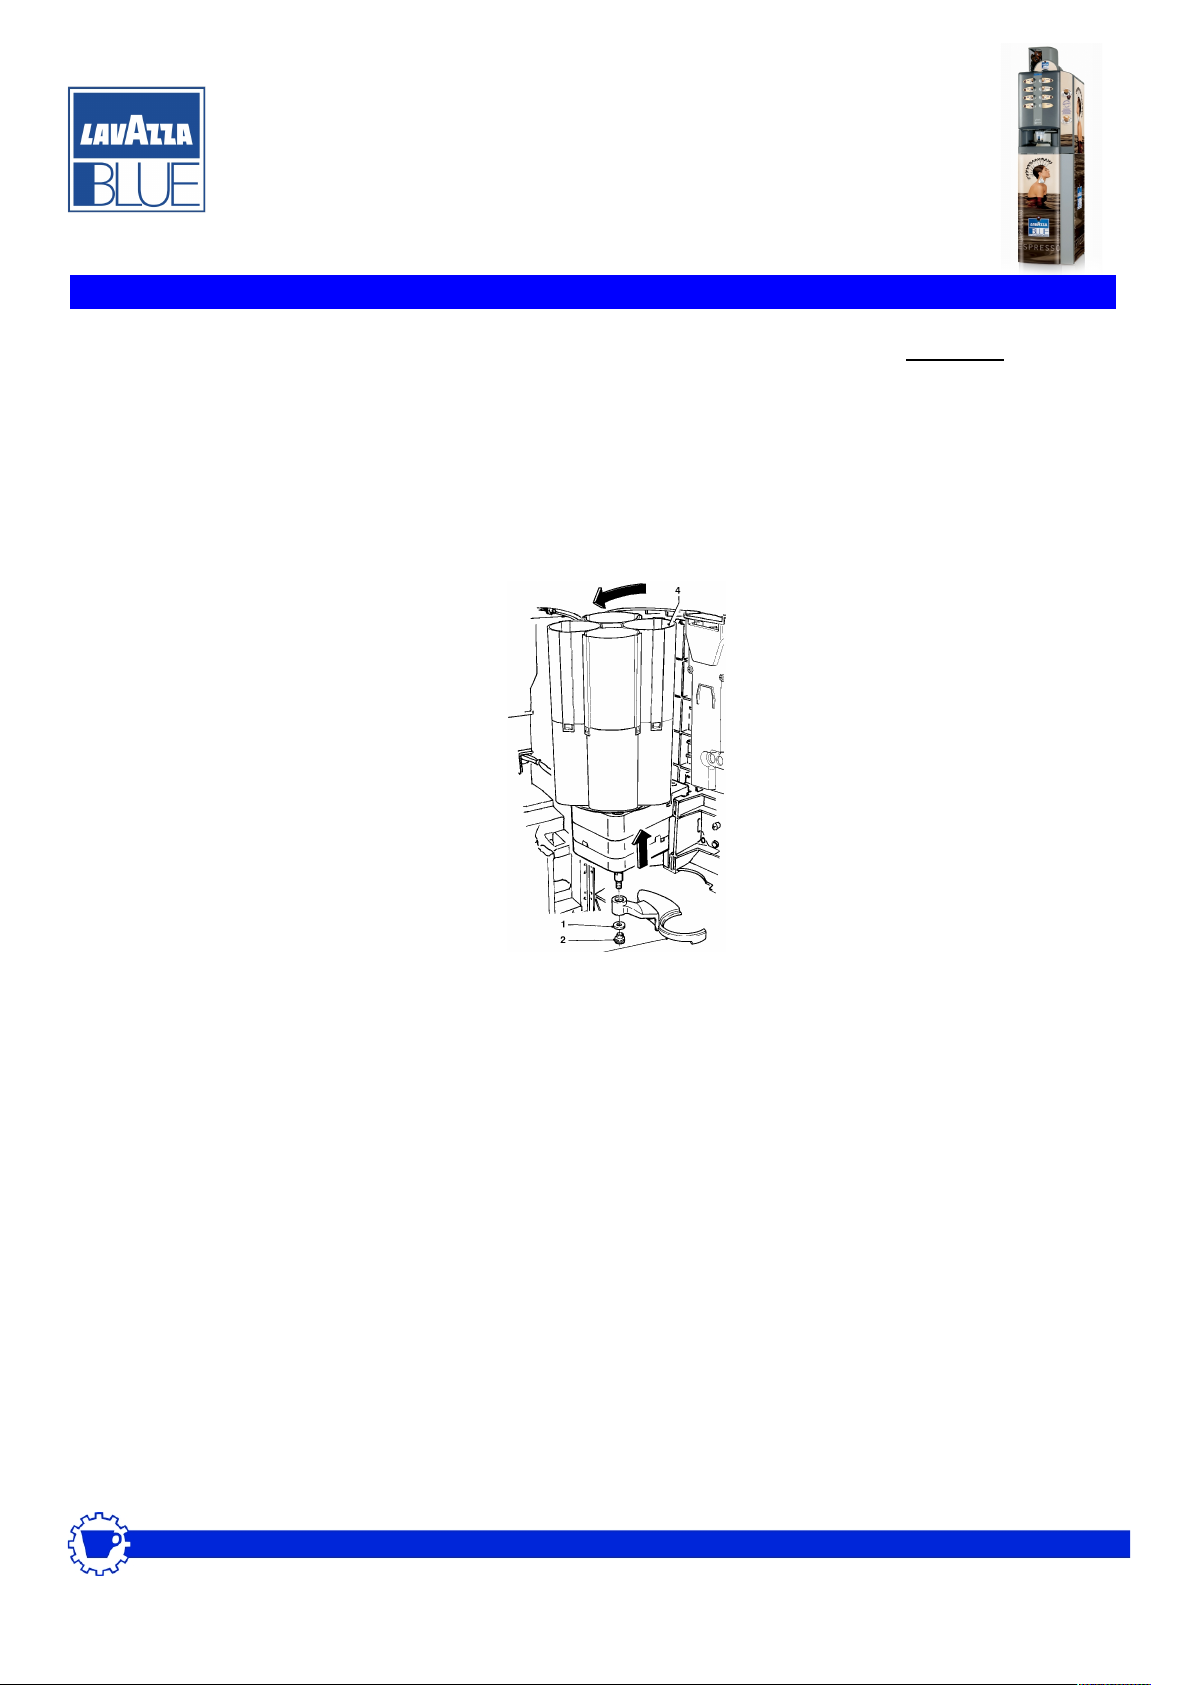
2. It is important to clean the mixing bowl assembly in order to prevent bacteria
build up.
3. Gently push downward on section 4 and firmly pull out the centre section 3 to remove.
Clean 2, 3 and 4 of all parts of powder residue using warm water and detergent.
Section 5 may be cleaned by rotating then pulling outward to remove. Reassemble in
reverse order. Do not clean any parts in a dish washer as this will cause damage.
Inhaltsverzeichnis
Andere LAVAZZA Automat Handbücher


Beliebte Automat Handbücher anderer Marken

Godrej
Godrej Minifresh 2000 Bedienungsanleitung

LAUREL
LAUREL 300 Montage- und Bedienungsanleitung

Macas
Macas MACES7C-300-90-00 Series Bedienungsanleitung

Dixie Narco
Dixie Narco SIID Bedienungsanleitung

VendNet
VendNet CB500-SA Bedienungsanleitung

FAS International
FAS International FASTER TMT Bedienungsanleitung


Azkoyen
Azkoyen STEP 74 Handbuch

SandenVendo
SandenVendo Snack Safety Point SVE SSP Betriebsanleitung

Intralot
Intralot Dreamtouch Smart Bedienungsanleitung

Westomatic
Westomatic Primo Compact Bedienungsanleitung

Crane
Crane Dixie-Narco Glassfront BevMax 3 5800 Bedienungsanleitung

Jofemar
Jofemar Vision Snack Plus Bedienungsanleitung