Pyle PLCMDVR15 Bedienungsanleitung


1.
PyleAudio.com
Table of Contents
1. Notes........................................................................................................................2
2. Production Specification ..........................................................................................2
3. Instructions for I/O Alarm Input and Output .............................................................3
4. Instructions for Remote Control ...............................................................................4
4.1 Description of Remote Control Buttons ..............................................................4
4.2 Soft Keyboard Input Description.........................................................................4
5. VCR Instructions ......................................................................................................5
5.1 User Login ..........................................................................................................5
5.2 Preview Interface................................................................................................6
5.3 Video Retrieval ...................................................................................................7
5.3.1 Instructions for Detailed Files and Backup...................................................7
5.4 Video Setting ......................................................................................................8
5.4.1 Frame Rate Dynamic Configuration ............................................................8
5.4.2 Small Bit Stream Configuration....................................................................9
5.5 Features Setting .................................................................................................9
5.5.1 Time Setting...............................................................................................10
5.5.2 Storage Device Management ....................................................................11
5.5.3 Instructions for Equipment Maintenance and System Upgrade.................11
5.5.4 System Setting...........................................................................................11
5.6 System Information ..........................................................................................12
5.7 Vehicle Information...........................................................................................12
5.7.1 Startup/Shutdown Setting ..........................................................................13
5.8 Display Setting .................................................................................................14
5.9 Password Management....................................................................................14
6.3 G Networking and Platform Application ...............................................................15

2.
PyleAudio.com
1. Notes
1.1 Definitions of connectors for aviation interfaces:
1 red: +12V positive pole
2 black: common GND
3 white: audio
4 yellow: video
1.2 Definitions of power cords:
Red: DC12V or 24V input
Black: ground GND
Yellow: ignition wire GND
1.3 Do the following to properly start the machine:
1. Lock the key lock (the lock is the switch of the machine);
2. Connect the red power cord to the battery positive, the black cord to the negative, the
yellow cord to the ignition wire of the car key (or ACC); or else, combine the red and yellow
cords as positive pole and black as negative.
Note:
1) Make sure the voltage of the battery is between 8V-36V before connection; otherwise,
the equipment may be burnt out;
2) With the cords connected, pay attention to the insulation between the cords to prevent
burning out of the battery due to short circuit of the cords;
3) Make the yellow cord is connected to the ignition wire; otherwise, the equipment will not
support delayed shutdown and the last video will be lost.
4) Note: the installation of on-board machine must use the positive and negative of the
battery instead of using bond strap as ground wire because bond strap will produce
negative impulse to disturb the normal operation of the host. The power cords for the
positive and negative power cord must be over Φ1.0mm in diameter.
2. Production Specification
MDVR is a cost-effective and functionally expandable equipment designed for video
surveillance and remote monitoring in cars, trains and other vehicles. It uses a high-speed
processor and an embedded Linux platform, in combination with the state-of-the-art H.264
video compression/decompression technology in the IT field. With SD card/hard disk as a
storage medium, MDVR is capable of 4-channel audio and video recording and driving
information recording in formats of CIF, HD1 and D1. MDVR is characterized by simple
appearance, superior vibration-proof performance, flexible and easy installation, powerful
functions and high reliability.

3.
PyleAudio.com
2.1 Definitions of Front and Back Panels
Front panel: PWR for power indication, REC for video indication, SD1 for SD card
indication, and IR for infrared receiver.
Back panel: POWER for DC12/24 power input, USB for mouse operation, I/O for
alarm input and output interface, AV1--AV4 for audio and video input, Video out for video
output and Audio out for audio output.
3. Instructions for I/O Alarm Input and Output
Alarm input 1 is the left-turn signal (whose function is to magnify Picture 1); alarm input
2 is the right-turn signal (whose function is to magnify Picture 2); alarm input 3 is the
reversing signal (whose function is to magnify Picture 4).

4.
PyleAudio.com
4. Instructions for Remote Control
4.1 Description of Remote Control Buttons
4.2 Soft Keyboard Input Description
Characters that can be input into the system include numbers, upper/lower case
English letters and Chinese characters. Pinyin input for Chinese characters is available by
shifting “pinyin/ABC” on the far right.

5.
PyleAudio.com
5. VCR Instructions
The items are capable of the following functions:
<Video retrieval>: search the stored video files in the hard disk/SD card and playback
these files;
<Video setting>: set the audio and video parameters, operating modes, etc;
<Features setting>: set alarm, PTZ, time, network, etc.;
<System information>: display the serial number, version number, MAC address and
other system information;
<Vehicle information>: set vehicle license plate number, timer startup/shutdown, WIFI,
etc.;
<Settings display>: set the monitor screen and video data, including the display of
information, region, color, volume, etc.;
<Password management>: set the password of the machine;
<Esc>: Esc the menu interface and return directly to the monitoring interface.
5.1 User Login
With the power cords connected, press <MENU> on the remote control to enter
directly into the login screen (the equipment is shipped with no password)

6.
PyleAudio.com
5.2 Preview Interface
Figure 1 Monitor screens of recording with a card and prompt for no card, respectively
Figure 2 Monitor display of “INFO”
The preview interface will display information about the working status of the
equipment and of the channels. The information is shown in the following manner:
[2011-8-31 09:54:34] shows the system time
[CHx] is channel name
[●REC] recording is in progress
[NO DISK ] no ongoing recording
[GPS : NO .... ] The “INFO” key on the remote control is pressed to quickly display
system information, such as GPS state.

7.
PyleAudio.com
5.3 Video Retrieval
Figure 3 Diagrams of video retrieval
• The video retrieval interface provides retrieval, playback and backup of the video files
stored in the disk.
• Available retrieval methods include fast and accurate time orientation, browsing of
recording status in a given time period, and browsing of specific video files.
5.3.1 Instructions for Detailed Files and Backup
Figure 4 Interface of detailed files
Detailed files are arranged based on channel order or video chronological order for easy
retrieval.
5.3.2 Playback Description
1. Two modes are available: single-channel playback and multi-channel synchronous
playback.
8.
PyleAudio.com
2. Play mode control provided, including: normal play, single-frame play, play in slow
motion, fast forwarding and rewinding. Volume adjustable.
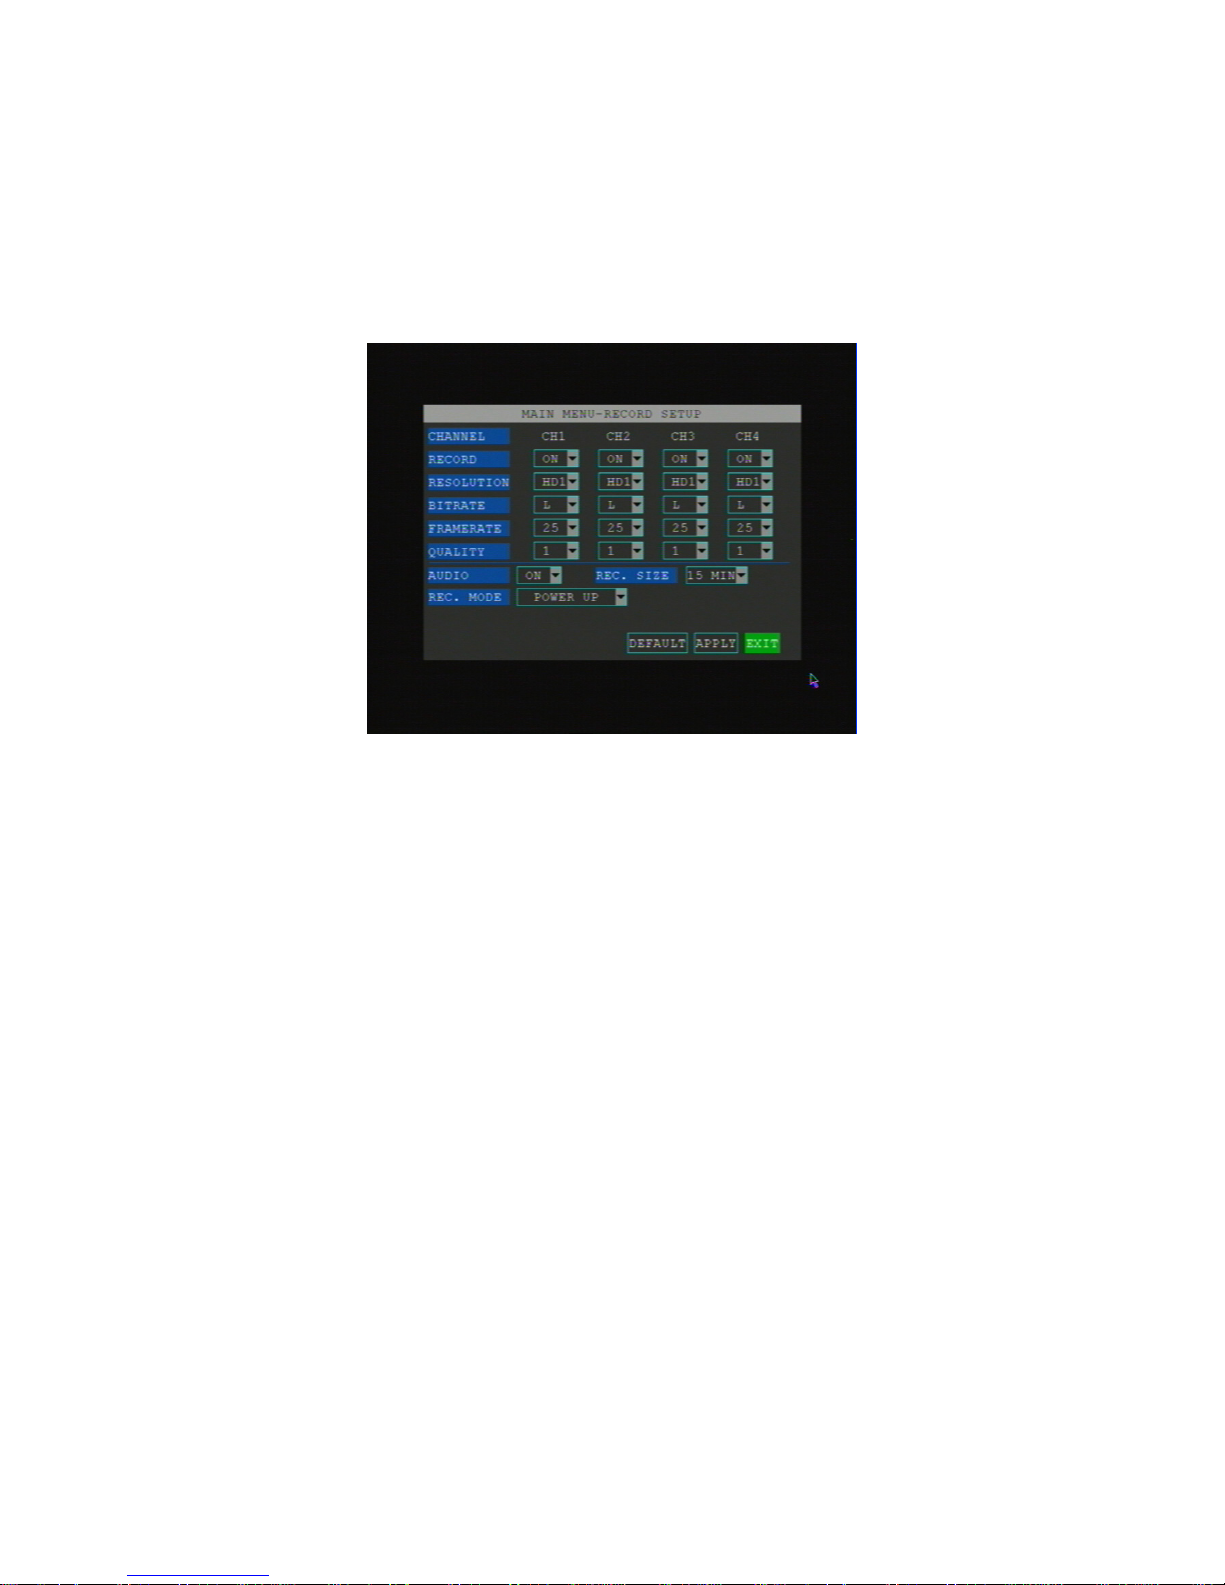
5.4 Video Setting
5.4.1 Frame Rate Dynamic Configuration
Figure 5 Video setting screen
1. The video setting interface provides setting for video mode, as well as the setting of
audio and video parameters for each channel.
2. Specific items include the video switch, resolution, bit rate, frame rate and picture quality
of each channel and the recording switch.
Video package time and video mode are as follows:
1. <Channel> / <Video switch>: on/off, recording on the current channel (or not).
2. <Resolution>: D1/HD1/CIF, optional.
3. <Bit rate>: high/medium/low.
D1resolution corresponds to 512Kbps (low), 768Kbps (medium), or 1024Kbps
(high).
HD1 resolution corresponds to 512Kbps(low), 768Kbps (medium), or
1024Kbps (high).
CIF resolution corresponds to 384Kbps (low), 512Kbps (medium), or 768Kbps
(high).
4. <Frame rate>: 1~25/30 optional; the bigger the frame rate, the smoother the playback
will go and the bigger space will be taken up in the disk.
5. <Picture quality>: 1 to 6 optional; the smaller the value, the better the picture quality will
be.
6. <Recording channel>/<Recording switch>: on/off, the video is recorded (or not) (audio
and video in sync).
7. <Package time>/<Video package time>: 15/30/45/60m, optional, set for the duration of

9.
PyleAudio.com
the video file when videoing.
8. <Video mode>: videoing upon startup or timer videoing, optional.
Videoing upon startup (default): to start video recording upon startup.
Timer videoing: the button <configuration of time section for videoing> will pop
up for configuration of the time section.
Click the button <configuration of time section for videoing> to pop up the time
section setting interface.
5.4.2 Small Bit Stream Configuration
Small bit stream now supports two resolutions of CIF and QCIF, with the bit rate, frame
rate and picture quality dynamically adjustable. Small bit stream mainly works in the case
of 3G remote.
5.5 Features Setting
The items are capable of the following functions:
<Alarm setting>: set various alarm input switches and parameters, actions with
alarm, alarm output parameters, Email setting, camera blocking alarm setting,
motion detection setting, etc.;
<PTZ setting>: set PTZ parameters;
<Time setting>: set date, time, daylight saving time;
<Disk management>: display the status of the disk and enable formatting of
hard disk and SD card;
<Equipment maintenance>: automatic restart of the equipment, system
upgrades, restoration to the factory settings, etc.;
<Network setting>: network setting, mobile phone access setting, etc.;
<System setting>: set the camera mode, the channel polling time, the system
language, etc.;
Inhaltsverzeichnis
Andere Pyle DVR Handbücher


